 Anchor
How to Use AnchorVaultCoin: A Step-by-Step Guide for Beginners
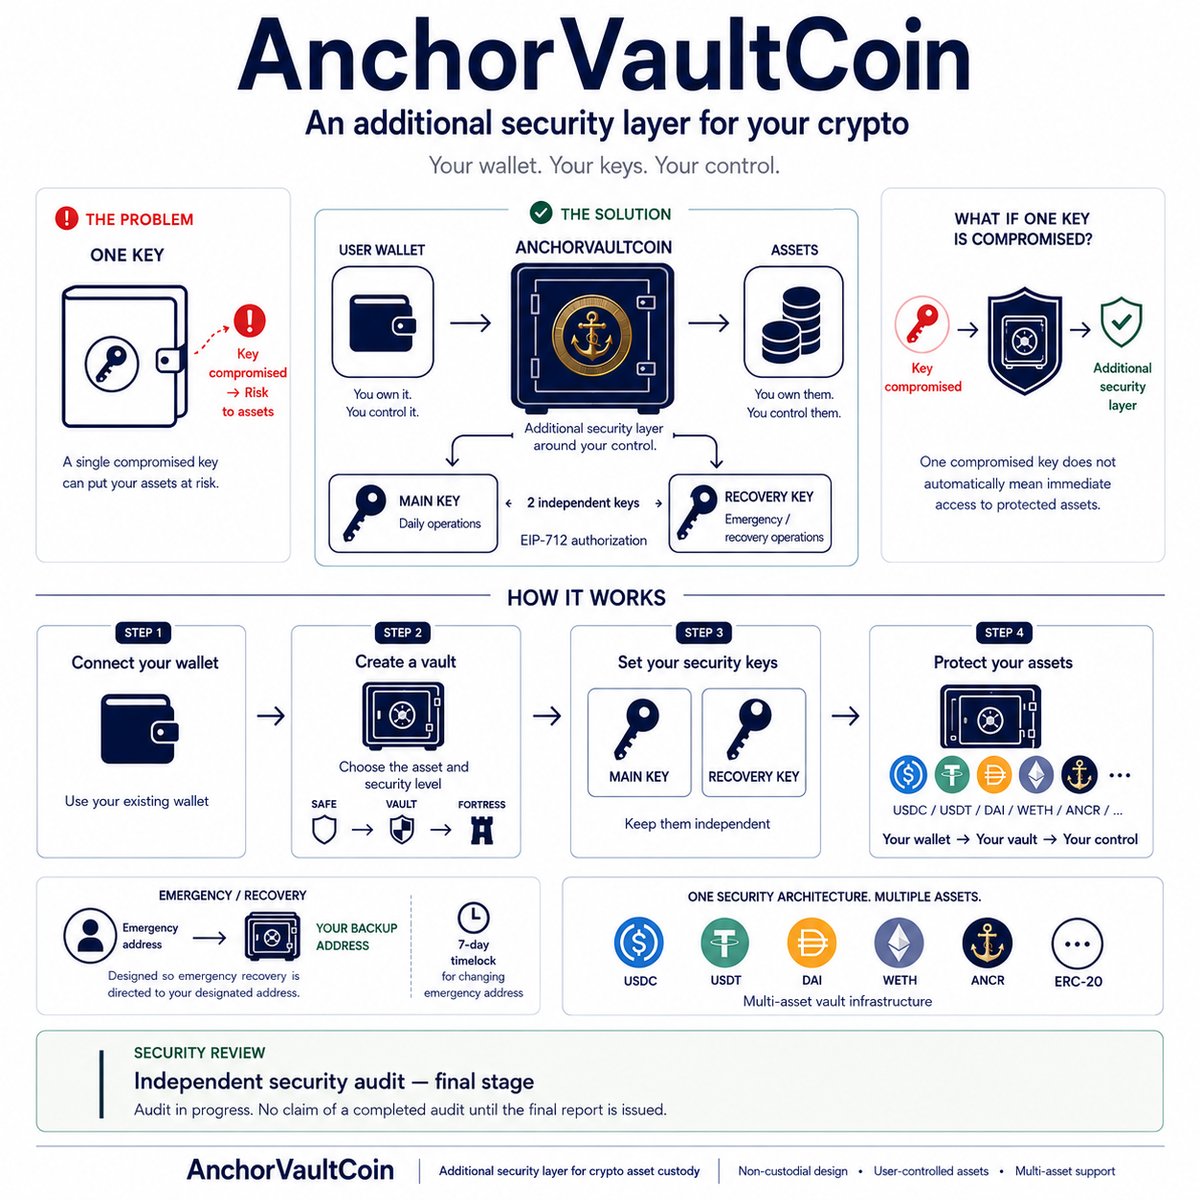
If you’ve ever worried about losing access to your crypto — a lost phone, a stolen seed phrase, or just a simple mistake — this guide is for you. AnchorVaultCoin is a new kind of non-custodial wallet: your money stays yours at all times, but withdrawing it requires not one, but two independent confirmations. Let’s walk through how it actually works, step by step.
 *How to Use AnchorVaultCoin
This guide walks you through the basics of using AnchorVaultCoin (ANCR) — from setting up a wallet to making your first transaction.
What You’ll Need
Before you get started, make sure you have:
- A compatible wallet (see below)
- A small amount of ANCR to cover transaction fees
- A secure place to store your seed phrase
Step 1: Set Up a Wallet
AnchorVaultCoin is supported by standard crypto wallets that handle ERC-20 tokens. Here’s how to get going:
- Download a wallet like MetaMask or Trust Wallet.
- Create a new wallet and back up your seed phrase. Write it down on paper and keep it offline — never share it with anyone.
- Once your wallet is set up, add the ANCR token manually. You’ll need the contract address, which you can find on the official AnchorVaultCoin website or in the project’s documentation.
Step 2: Get ANCR
You can acquire AnchorVaultCoin in a couple of ways:
- Purchase on an exchange — if ANCR is listed on a centralized or decentralized exchange, buy it there and withdraw it to your wallet.
- Receive from someone — have another user send ANCR directly to your wallet address.
Step 3: Make a Transaction
Sending ANCR is straightforward:
- Open your wallet and select ANCR from your token list.
- Click “Send” and enter the recipient’s wallet address.
- Enter the amount you want to send.
- Review the transaction details, including the network fee.
- Confirm and wait for the transaction to be processed on-chain.
Step 4: Track Your Balance
Your ANCR balance updates automatically in your wallet. For more detailed tracking, you can paste your wallet address into a block explorer to see your transaction history and current holdings.
Security Tips
- Never share your seed phrase with anyone, including support staff.
- Double-check addresses before sending — transactions are irreversible.
- Use a hardware wallet for larger amounts.
- Beware of phishing sites — always verify you’re on the official AnchorVaultCoin website.
That’s it. You’re ready to use AnchorVaultCoin. If you run into issues, check the project’s official documentation or reach out to their support channels.*
What is AnchorVaultCoin, in plain terms
A typical crypto wallet works like this: one key (the seed phrase) gives you full control over your funds. Steal the phrase, steal everything. That’s the root cause of most crypto thefts.
AnchorVaultCoin works differently. Your funds sit in a personal “vault” inside a smart contract, and any operation — withdrawal, transfer, or settings change — requires a signature from a separate authorization key that isn’t your wallet. Even if your seed phrase leaks, an attacker can’t move your funds to their own address: they simply don’t have the second key.
How to create a vault, step by step
- Connect your wallet. Just like with any DeFi service — MetaMask or the equivalent.
- Open a new vault. Pick a level: SAFE, VAULT, or FORTRESS — they differ in fees and available time locks (more on that below).
- Set a backup (emergency) address. This is where your funds will go in a worst-case scenario if you lose access to both keys. You set it once; you can change it later, but only with a 7-day delay — that’s protection against someone swapping the address without your knowledge.
- Deposit funds. You can top up with a wide range of ERC-20 tokens — not just the “standard” ones with 18 decimals, but also tokens like USDC or WBTC.
How to withdraw funds
A regular withdrawal requires a signature from the main authorization key — that’s your everyday operation, with minimal fees. If you want the recipient’s consent “just in case,” there’s a quick transfer with recipient confirmation, or a more cautious option with a 48-hour escrow (secure transfer).
What to do if you lose access to your keys
This is the most common fear among crypto users — and it’s exactly the scenario the emergency exit is built for.
panicWithdraw — an operation that requires no signature at all. Anyone can call it from any address. But two important safeguards keep it safe:
- Funds only go to the backup address you set in advance — never to the address of whoever called the function.
- A 20% penalty is deducted — that’s the price of having this emergency exit open to anyone without a signature.
So even if an attacker gets hold of your main wallet (but doesn’t know your backup address or have your authorization keys), the worst they can do is force your funds to your own backup address — losing 20% in the process. They can’t steal them.
Vault levels and fees
| Level | Fee (open/deposit) | Max time lock |
|---|---|---|
| SAFE | 0.50% | none |
| VAULT | 1.50% | up to 72 hours |
| FORTRESS | 2.00% | up to 168 hours |
Full table of operations and their costs
| Operation | Fee | Who signs | Where funds go |
|---|---|---|---|
| Regular withdrawal | 0.50% | main key | any address |
| Quick transfer | 0.50% | main key + recipient consent | to recipient |
| Secure transfer | 0.50% | main key + recipient confirmation | to recipient |
| Early closure | 5% | backup key | to owner |
| Return to backup address | 10% | backup key | to backup address |
| Emergency withdrawal | 15% | backup key | any address |
| Panic withdrawal (no signature) | 20% | not required | backup address only |
Independently audited
The smart contract is currently undergoing an independent security audit at Hexens (hexens.io) — one of the well-known auditing firms in the crypto industry — as part of their Builder Support Ecosystem Program. As of publication, the audit is in its final stage: the initial report has been received, the issues found have been fixed, and a retest is underway. The final report hasn’t been released yet — until then, any claims of a “passed audit” would be premature, and we’re not making any.
FAQ
Is this a non-custodial wallet? Yes. Only the owner can manage the vault, using their authorization keys. The project creator has no access to anyone else’s funds — that’s built into the contract architecture, not just a promise.
What if I lose both keys at once? That’s what the panic withdrawal is for — the only operation that doesn’t require a signature. Funds don’t “burn” or stay locked forever — they go to your backup address.
Can I deposit tokens other than ANCR? Yes, a wide range of ERC-20 tokens is supported.
When is mainnet? The mainnet launch is on hold until the final audit report is released — that’s a firm stance for the project.
Website: https://anchorvaultcoin-hash.github.io/anchor-vault-frontend/landing.html
Telegram: https://t.me/AnchorVaultCoin
X: https://x.com/Anchorvaultcoin